We have our first tutorial on adult traffic ad network – Exoclick. If you’re not familiar with them, then Google them. But if you want the magic cards to the deck, the bulk of what’s talked about regarding Exoclick is behind closed doors at the IMGrind Private Forums.
However, I’m feeling rather generous tonight, so here’s a tutorial on how to quickly setup campaigns Exoclick.
This is a mobile only campaign.
What you need:
- Hosting
- iMobiTrax Tracking
- Revived Media Affiliate Account
- Offer
- Creatives
- Description & Restrictions for targeting
Step 1. Offer Recon + Assets Round-up
Revived Media – In your affiliate panel, you want to test offer id: 1438. You will see the description of the offer like below:
ID: 1438 Name: Playaga – Germany – 2 Landing Pages
Conversion flow: Content billing flow: The user enters the landing page and selects their content. A message is prompted. Once they select then message and then confirm by clicking again (2 click flow) the conversion pixel fires.
Target handsets: All
Accepted carriers: Vodafone, T Mobile, Eplus, and O2.
Restrictions: No Wifi. Usage of the word “FREE” or words with the same or similar meaning are not allowed. Additionally, creative’s used may not be misleading or deceptive. No i-framing, incent, content locking, or SMS.
Landing Pages: There are 2 of them, and they are NSFW so I’m just choosing the first one here.
Creatives: I see a few 300×250 which are perfect for the mobile 300×250 placements Exoclick has available. ![]()
So, my idea here is to test Offer: 1438 Playaga Germany -2 LP’s, 4 banners at 300×250 with each banner spit 25% between each lander.
Easy enough, let’s set that up right away…
Step 2. iMobiTrax Campaign Setup
Ok, I know Exoclick has a couple of their own click tokens. You have to ask a Rep or search deep for them, but they are now available to you if you were not aware, in the screenshot below:

So, I got my 3 click tokens setup. Now, when I run custom click token reports in iMobiTrax, it will show me how well/bad a sitename is performing + campaignID + which of my 300×250 banners. Yep, we added in 1 so now we just switch ad=1 to ad=2 with banner two and with banner three ad=3, so on and so forth. Pretty simple to see banner reports ehhh?:-)
Got my details setup into a new iMobiTrax campaign:

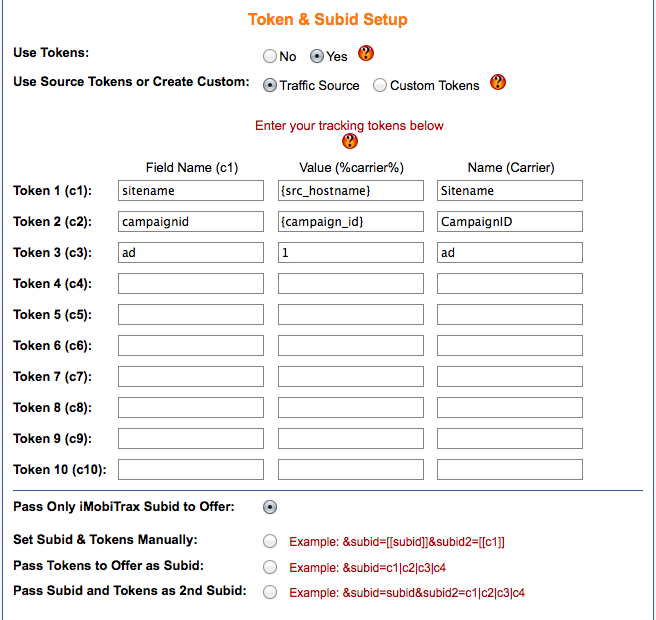
As you can see, I already added the extra click tokens and pre-populated them here in our iMobiTrax campaign. I’m also passing only iMobiTrax subid to offer.
Perfect, I scroll down in iMobiTrax and name my offer urls + input each affiliate link, properly constructed, into each offer url field in iMobiTrax. I’m splitting both of these landing pages at 50% each. Both payout $16.00 CPA.
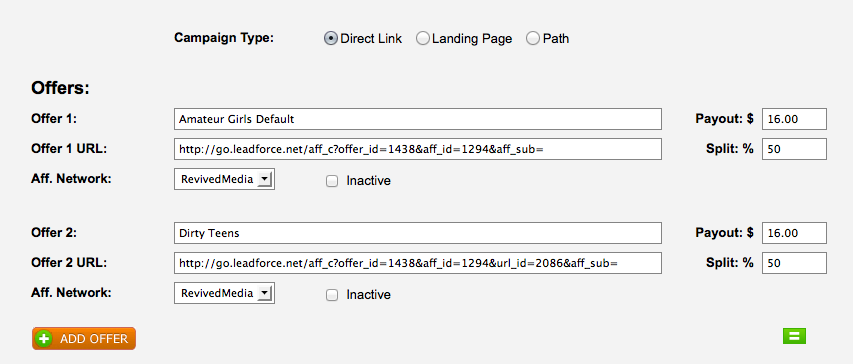
Correct Setup From Revived Media + iMobiTrax
You come to a point, where there is a little back and forth between your Revived Media Panel and iMobiTrax Campaign Setup. I want to make that as smooth as possible here.
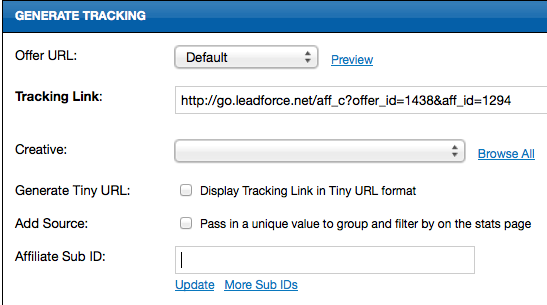
Revived Media – So, the first thing is to scroll through your offer, until you get down to the Generate Tracking URL Box. This is what you see:
Revived Media – Click on “Add Affiliate Subid” type “xx” into the box. Click Update, and look at your new link in the tracking link box now:
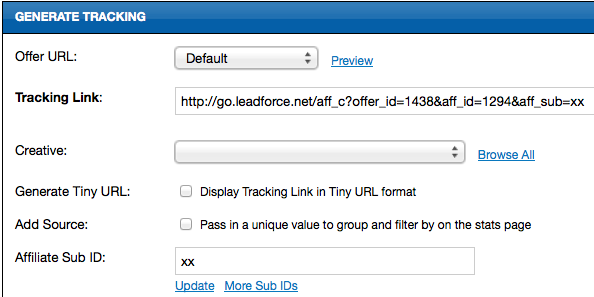
Now, take that link, but after &aff_sub=, chop the xx. Don’t use it in iMobiTrax. Chop the xx off, so the affiliate link looks like this, then input this as your offer url in the boxes provided:
https://go.leadforce.net/aff_c?offer_id=1438&aff_id=1294&aff_sub=
That’s where your affiliate subid number is dynamically inserted for that campaign. Right after your subid comes the custom tokens you set in iMobiTrax for easy analysis and shuffling around.
Now, when I got to pull the 2nd lp from Revived Media and construct my link. I added xx to subid and clicked update, but now my link looks funky Ruck?
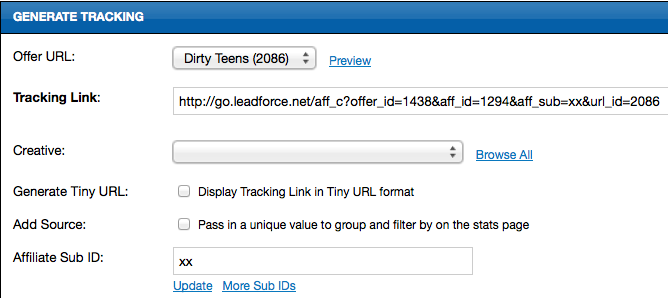
Really, this is simple too.
See the &aff_sub=xx
Copy that from the url, and stick it on the end. Basically, swap out &url_id=2086 with &aff_sub=xx. Also, make sure you cutoff the “xx” directly before sliding into iMobiTrax.
Just make sure it looks and displays correctly before implementing into iMobiTrax. The current iMobiTrax form for your affiliate url above would be:
https://go.leadforce.net/aff_c?offer_id=1438&aff_id=1294&url_id=2086&aff_sub=
Seriously, iMobiTrax campaign is setup. Scroll down until you see your campaign link. Make sure to always test it! Also, grab your postback URL from iMobiTrax and place it correctly in the offer at iMobiTrax that you are running:
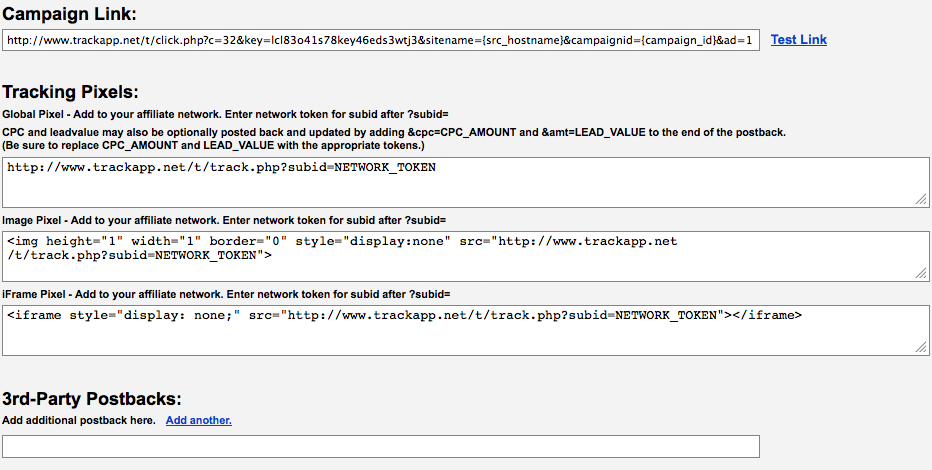
Your postback in iMobiTrax looks like this on the end of ?subid=NETWORK_TOKEN
Grab the entire post back url from IMobiTrax. Paste into the Postback URL box of Revived Media:

Make this in iMobitrax that you pasted into Revived Media:
From this –> https://www.trackapp.net/t/track.php?subid=NETWORK_TOKEN
To This –> https://www.trackapp.net/t/track.php?subid={aff_sub}
Click Save. You’re done with Revived Media + iMobiTrax. Now, it’s time to setup that campaign on Exoclick!
Ryan, Bill and myself have that entire campaign process down in under 2 minutes flat. Once you have access to traffic sources, and you have your traffic sources, their extra token information, their ad unit types and sizes and ad options they offer, you can literally walk in with iMobiTrax and level the place to the ground, that’s why we built it.
Well, to be straight up, Exoclick has shit for mobile targeting options, I went very generic with my targeting. That’s the power of iMobiTrax. Doesn’t matter what I speculate or walk into, it’s there to record and display everything down to the most granular of variables. Ok, back to Exoclick setup:
Traffic Types – Mobile: All Mobile Devices
Mobile Carriers – All Mobile Carriers
Category – Adult: All
Ad Format – Banner 300×250
Countries – Germany
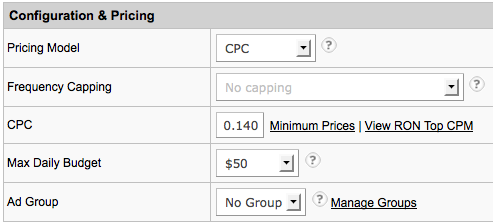
Yea, $0.14 WTF for Mobile German traffic….Hmm, we’ll see about this.
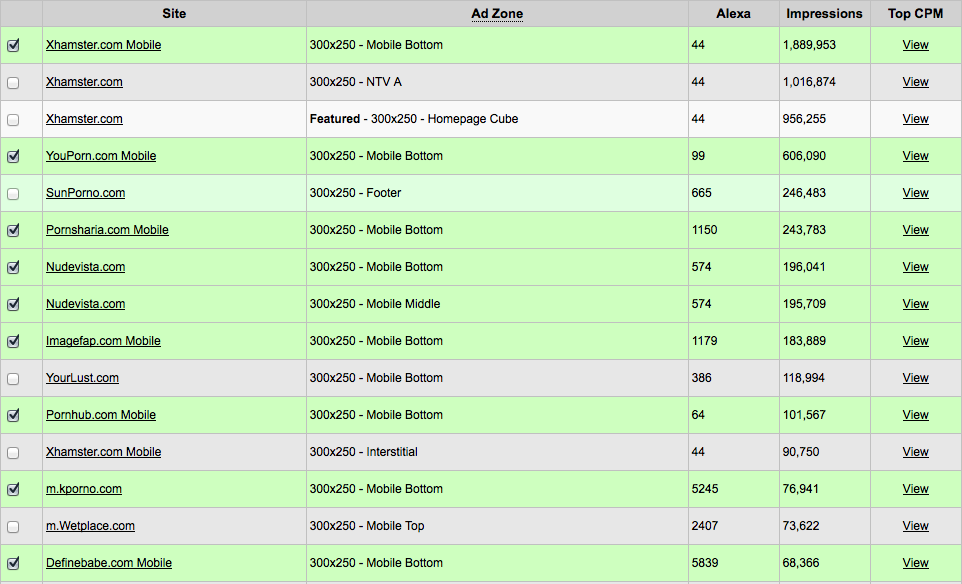
Sites: Targeting: Premium Placements.
Here’s a few in a screenshot I chose. I was shooting for the 300×250 mobile ad unit that slips so neatly in flow with the adult tube sites out there.
My Marketing Material:
NSWF!! – Might as well be transparent as possible here. Here are the 4 most professional looking banners I want to start testing.
Note: Each of these 4 banners is hot-linked to each landing page.
Remember: 2 landing pages, 4 banners

There you go. That baby is all setup and ready to run.
Once you spend $50.00 you’ll get data back on which banners performed best for each offer lp. You’ll also know which LP converted better. ![]()