A powerful feature of iMobiTrax is the ability to use custom tracking tokens. By default our platform automatically collects important information about the user’s device including: Manufacture, Name, Model, Combined Name, Marketing Name, Type, Operating System, Display Size, Resolution, and Data Speed. Outside of the device analytics we also capture: Referring URL, IP Address, Carrier, Internet Service Provider, and Country. While this information provides plenty of data to begin optimizing at times you’ll find the need to add additional parameters.
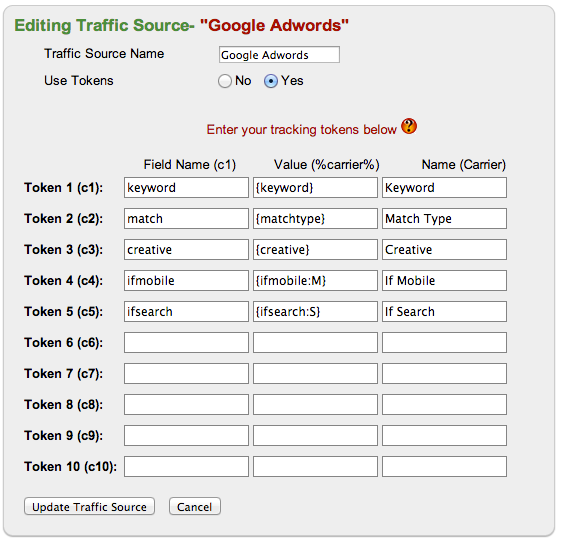
Let’s consider Google Adwords. They allow additional dynamic tokens to be passed to gather more detailed information about your particular campaigns. The setup inside iMobiTrax looks like this:
These dynamic parameters are automatically filled with the information from your campaigns. For example, if you’re bidding on the keyword “auto loan” then the people that click your tracking link coming from this keyword will be displayed in your reporting. Adwords also passes a unique creative ID so you can see the exact banner the user clicked on and decide which one performs the best in terms of EPC and conversion rate. However all traffic sources don’t always provide these dynamic tokens.
Let’s talk about Facebook ads for a moment. Unfortunately they don’t offer these type of tracking tokens so when you’re running a particular creative you only know which one converted by using their internal conversion tracking. With iMobiTrax we built in a feature that allows you to manually enter a unique name for each creative so you will have this available inside your reporting. This is very easy to setup with just a few additional steps.
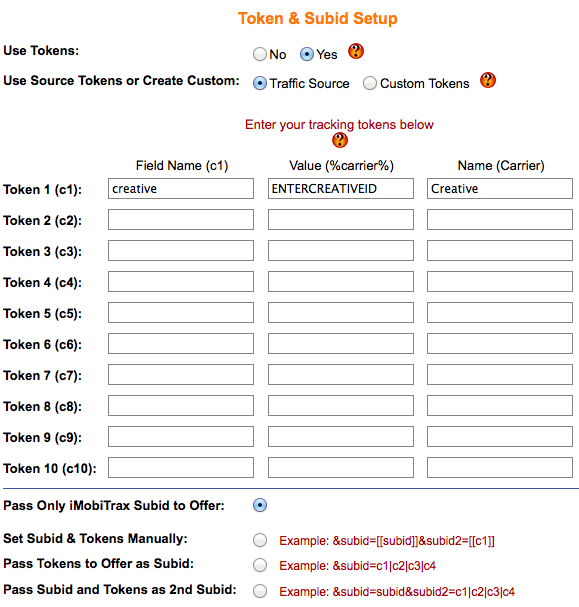
When setting up your campaign you want to make sure you define to Use Tokens by selecting yes:
You then have two options: Traffic Source or Custom Tokens. I personally use Traffic Source 98% of the time because I have additional tokens already setup for each source. If not you can simply define Custom Tokens it doesn’t make a huge different especially if you don’t have variables already loaded. We then want to create the custom token that you’re going to be defining in your tracking links. In my example, I have no custom tokens setup for Facebook and I’m simply going to add one for “creative”:
As you’ll notice I have entered three different fields:
Field Name (c1) – this is what the field is going to be in the URL string.
Value – this is the actual value of the field that I will MANUALLY edit each time I’m uploading a campaign. That’s why I set it as ENTERCREATIVEID to remind me when pulling my campaign link that I need to manually edit it.
Name (Carrier) – this is the value that will be shown in the reporting of iMobiTrax.
After this information is added you will proceed to setup your campaign as normal. In this example I’m simply going to be direct linking to the campaign but the process is the same for the other campaign types.
When the campaign is created we’ll have our campaign link with the token we setup in the steps above. For my example, the link looks like this:
Notice at the end of the link it contains ENTERCREATIVEID. To track creatives I will simply manually edit this when I go to place my ad on Facebook. I will enter a unique name with no spaces. For example I could do something like: 04_03_13_banner_a. This unique identifier will allow me to track the exact creative that’s yielding me the best ROI.
More-and-more traffic sources are becoming user friendly allowing dynamic tokens to be passed. However when you come across one that doesn’t (such as Facebook) rest assured that you can still use iMobiTrax to be able to track every step of the conversion process. This isn’t just for mobile either. Remember you can use iMobiTrax as your “all in one solution” tracking your pay per click, Facebook, pay per view, media buys, and any other campaign you’re looking to monitor your ROI.


