Hey iMobiTraxxers,
I bring forth an easy to understand tutorial on how to setup a campaign on the mobile advertising network mMedia.
Ok, so basically, I’ve gone ahead and pick a mobile apps offer from Revived Media. Offer ID: 1644 Love Again iPhone App – US.
I know that mMedia has a load of app traffic. Plus, this offer accepts Wifi traffic! High-five!
What I literally need to find is a load of cheap traffic in the US, CA, AU and UK segmented by iPhones + Androids, with Carrier + Wifi targeting options. Ahh man, this is going to be easy because I’m literally going to have to cut non-performing Operating Systems, Manufacturers and specific Devices. As for market share, all 4 of these countries are heavy in smartphone penetration AND adoption rates. In conclusion – the fucking market is huge, and getting bigger. Do I need to say more?
Step 1 – mMedia Self Service Campaigns
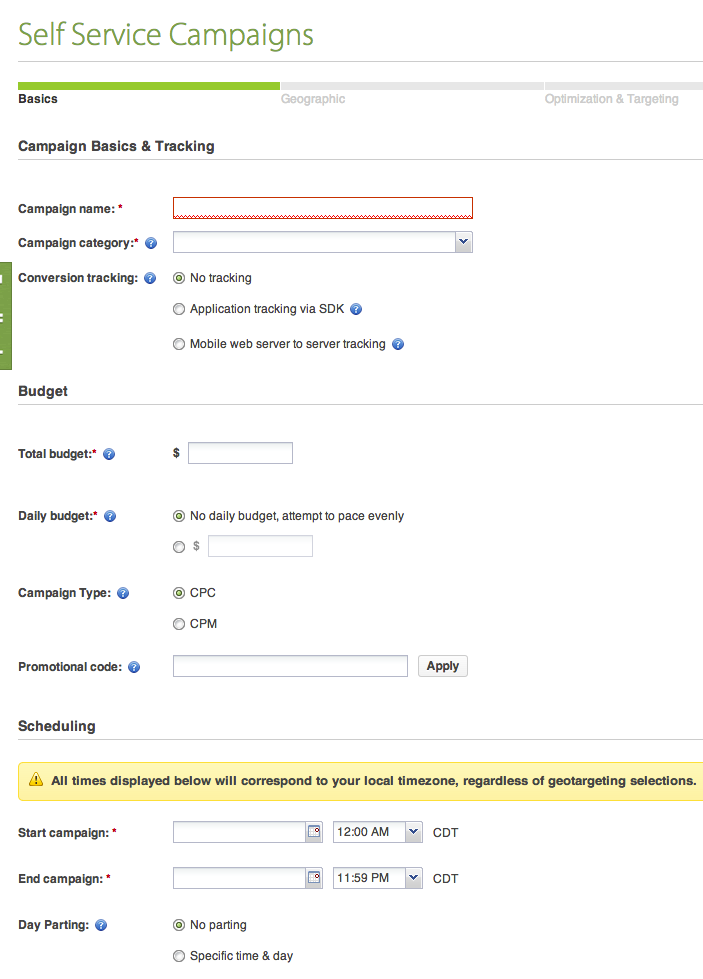
Login into your account. Click on Campaigns. Click on New Campaign. You come to the campaign basic and tracking page:
Step 2 – In another screen ( I use two-monitors) I open My iMobiTrax Dashboard and click on Campaigns, then Add Campaign:
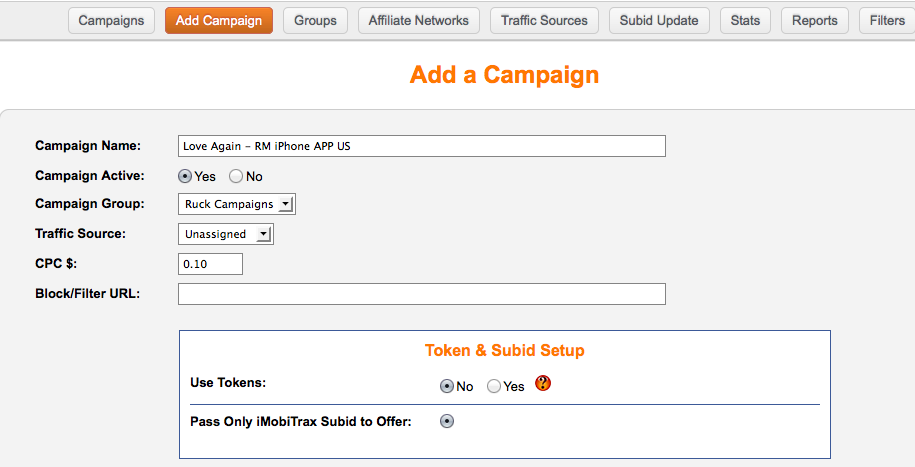
Hopefully this makes sense. I need to complete step 2 to actually complete step 1. I’ve named my campaign in iMobiTrax in step 2 along with activating the campaign. set my campaign group, an unassigned traffic source because I actually don’t have mMedia in this installation of iMobiTrax, so I won’t be needing or using their tokens anyway. My minimum cpc I always set to $0.10 but depending on your campaign setup in Step 1 – this can actually go up or down which you will want to edit back here on step 2 once the campaign is live and running. (Tip)
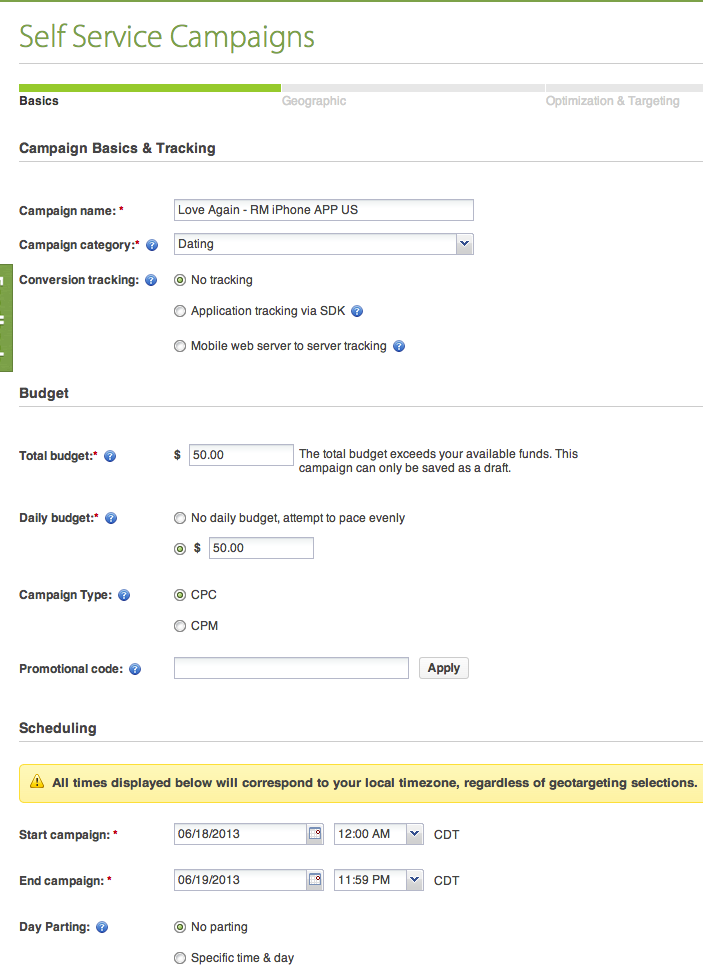
So back on Step 1 – I’ve copied over my campaign name from iMobiTrax over to mMedia. Now, I want to fill in the details of my mMedia campaign. You will notice in this campaign, my goal is to spend $50 as fast as possible. That’s why my daily budget is equal to my total budget along with a cost-per-click payment type, I’m starting the ads right now and run till tomorrow at this same time, so hopefully I can spend my entire $50.00 budget gathering data and I chose no parting because I have no previous data that tells me if this app converts better on a separate day or hour.
But…You can and will definitely want to get that granular to improve your ROI on the campaign (Big Tip)
Select Next, then let’s choose where we want to run the campaign (US of course). If you don’t know, mMedia offers 4 different types of campaigns – All Countries, Country Specific, Region Specific and Hyper Local. Hyper Local is something I want to talk about later on because targeting mobile app dating campaigns can fill the bank quick! For now, we choose the US:
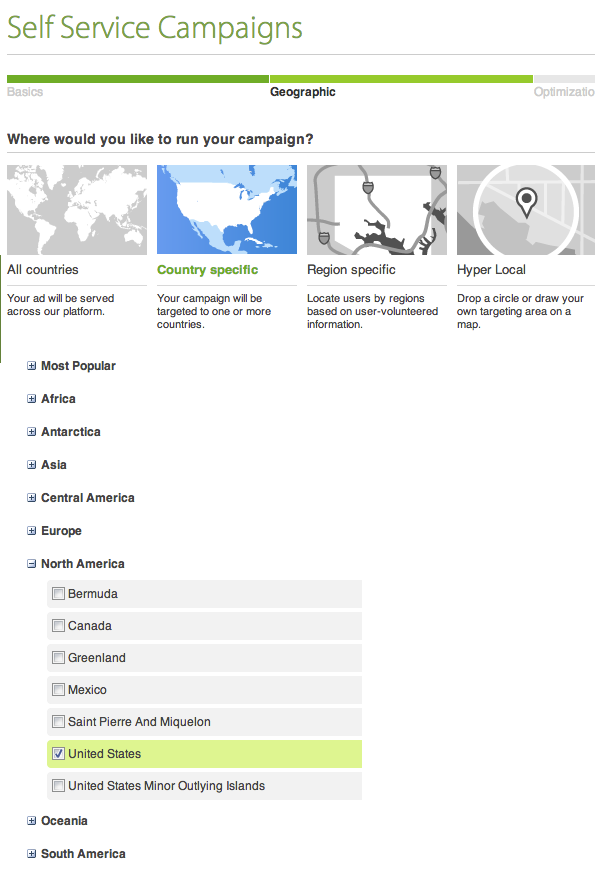
+ Rep to mMedia for a pretty simple and easily navigable interface. Legit, smooth and to the point. No clutter.
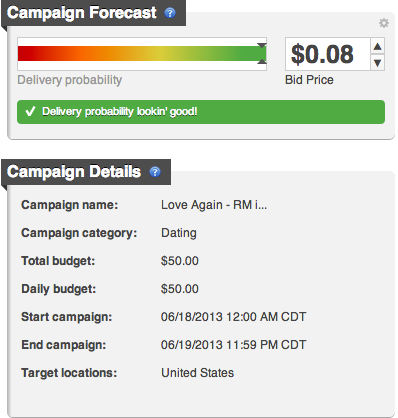
You will notice on the right of your mMedia panel, you have a Campaign Forecast module. When I changed my country to the US, mine went from a minimum bid price of $0.05 to now $0.08. So as of right now, I’m still under the $0.10 I bid in iMobiTrax. ![]() . The little delivery probability says lookin good…ok, I am gonna take their word for it.
. The little delivery probability says lookin good…ok, I am gonna take their word for it.
Now you will come to mMedia’s 4 main mobile ad targeting options – Device Targeting, Carrier Targeting, Audience Targeting, Site Optimization
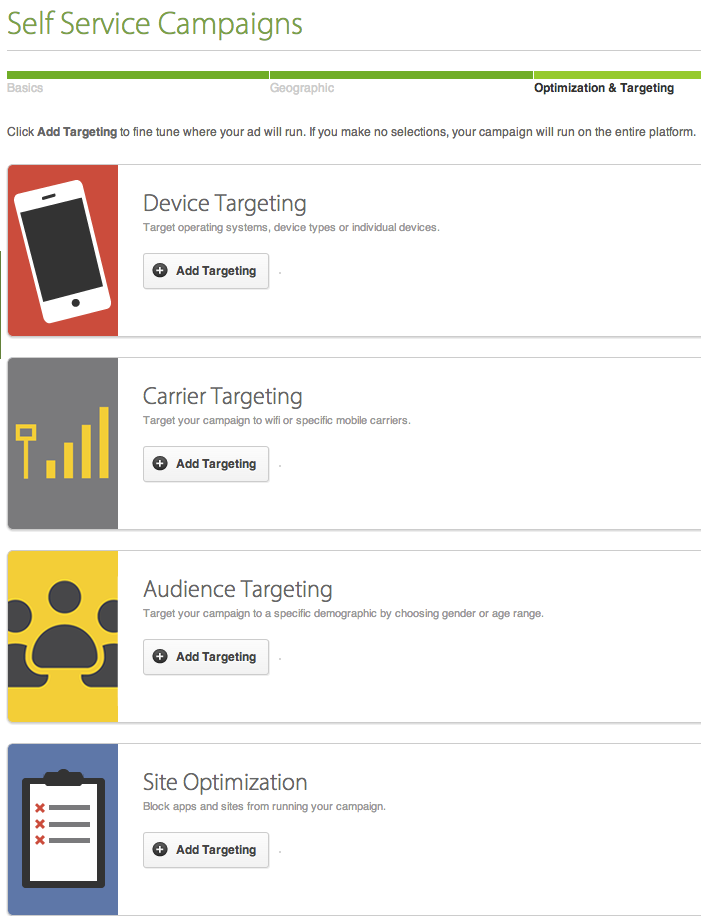
I know from my offer description (not to over-think this), I need iphone traffic in the United States. I choose Device Targeting.
mMedia has two options when you click on Device Targeting – Operating Systems & Type (Which I Choose) and Advanced Model Selection. Their targeting options are getting better and better each month it seems!
I choose Operating System: iOS, Select Devices: Smartphones
Now, I will be getting feature phones, tablets and other connected device type traffic (think Amazon Kindle)
I click on Save Targeting.
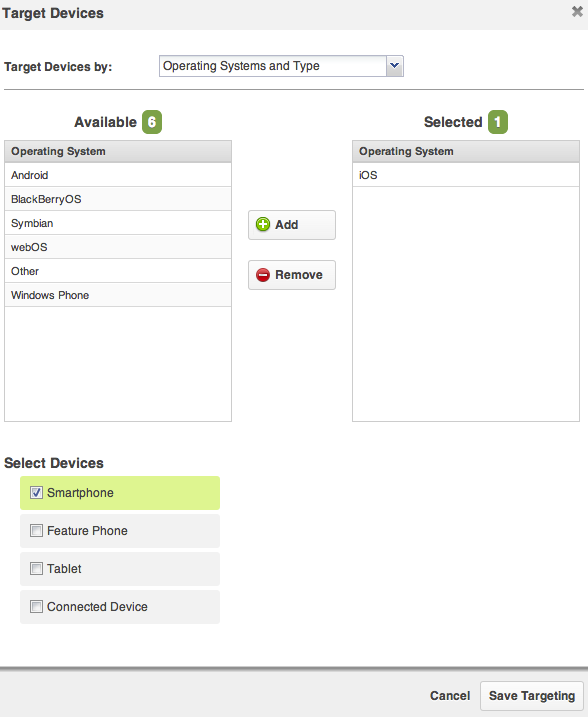
My bid price now went down to a Minimum $0.06 CPC bid. ![]()
You will then be brought to the Select Creatives page of your mMedia campaign setup. Here’s where we will have to alternate a bit back n forth from Revived Media to iMobitrax and back here again. I will make this as simple as I can though:
Step 3 – Grabbing the offer information from Revived to put into iMobiTrax:
ID: 1644 Love Again iPhone App – US
Conversion flow: The user arrives at the app store and downloads the application. The conversion pixel fires on successful installation.
Accepted carriers: All including Wifi.
Target devices: iPhones
I go under “Generate Tracking Link” Click on “Affiliate Sub ID” and input xx, which appends &aff_sub=xx to my Revived Media Affiliate Link:
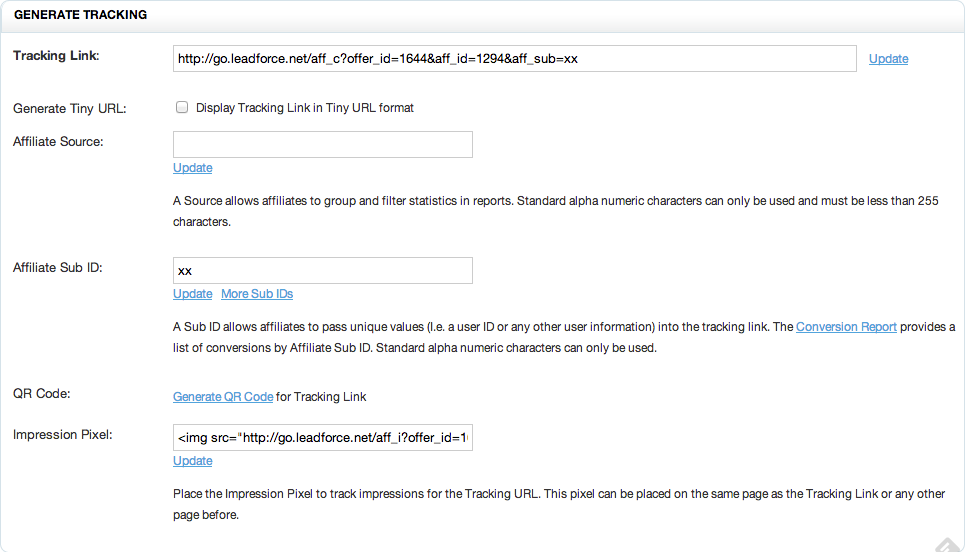
Now, I copy that link and take it back over to my iMobiTrax Campaign Setup. Since this is a simple direct link campaign setup, it’s very simple to implement. You simply enter your Offer Name – which is Love Again iPhone App US, choose direct link radio box, input the offer payout of $1.40 and set the split % to 100. Then I simple input my revived media affiliate campaign subid url specifically for that offer I setup earlier, but I make a small change – I CUTOFF THE “XX” at the end of the link and then enter it into iMobiTrax. Like This:

Now, every click that comes in, iMobiTrax will do it’s magic and track the 20+ tracking options it has to offer.
I click on Add Campaign.
Step 4 – Campaign Final Setup & Migration
Ok, we now have everything pretty much setup. Go quickly into your iMobiTrax campaign and set your minimum CPC to $0.06 like mMedia offered at the end there.
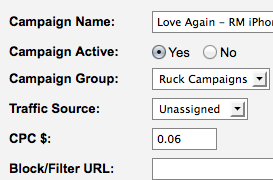
Scroll down in iMobiTrax to your Campaign Link and Tracking Pixels:
Click on test link – Yep, works correctly. Proceed. – Always test your link! Always!
I want to grab my Tracking Pixel out of iMobiTrax, copy/paste it over to my Revived Media Affiliate Postback URL option.

Note: I chop off the NETWORK TOKEN after subid= and replace it with the optional Postback URL for Server (Cookie-Less) tracking: {aff_sub}
So now my link in Revived Media looks like this:

Click on Save. You Postback has been setup correctly and will now fire conversions through your campaign tracking link. BOOYAH! Advantage over everyone not using iMobiTrax. ![]()
Now, grab your Campaign Link from iMobiTrax:

Put that link into your mMedia account and link it to any of your creatives you want to run. ![]()
Note: mMedia offers both Text ads and which look like this: (Just an example:)

Don’t under-estimate the power of text ads. Especially for mobile web or in-app advertising. A strong message with clear call to action that benefits the user is literally the most important thing I can tell you today with the current mobile advertising methods that are available. Test text ads in every country!
mMedia also allows you to upload your own custom creatives and also create a gallery in your account. Pretty useful feature for Agencies like us.
I simply attach that text banner inside mMedia with my campaign link from iMobiTrax. I then attatch my destination url (My campaign link from iMobiTrax)
 Click on attach campaign. My minimum bid CPC’s stayed at $0.06. Here if they change in your mMedia account, simply go to your iMobiTrax campaign setup, input the correct CPC on the campaign and make sure to update the iMobiTrax campaign. No biggie.
In mMedia, setup your Basics, Tracking, Budgeting and Scheduling, I already told you what I’m trying to accomplish. Set your Geography. This is a US only campaign. Optimization and Targeting, it’s correctly setup – Targeting iOS, Smartphones in the US.
I’ve got my text creative attached with my correct iMobiTrax tracking link.
Save it and start it. Goes into review. Once approved – You’re off and running!
That’s just a simple direct-linked campaign with one creative type. You of course can track unlimited offers, creatives and landing pages with iMobiTrax and in 4 countries available on this offer across iOS and Androids, this market is extremely easy to produce over 1 million dollars in a month in application install commissions.